
Did you know that 25-30% of home heat loss happens through leaky windows? This fact from the Department of Energy shows why many homeowners rush to caulk their windows. But applying caulk in the wrong places can cause big problems. We want to help you avoid these mistakes that could cost you money and time.
Knowing where not to caulk around windows is just as important as knowing where to caulk them. Sealing weep holes can trap moisture and lead to mold growth. Caulking moving parts can seal windows shut and make them hard to open. We also need to be careful about caulking window trims, as this can harm the window structure. If you make these mistakes, you might even void your window warranty.
Proper caulking helps stop drafts and cuts energy bills. However, bad caulking can make things worse instead of better. Throughout this article, we will show you the spots to avoid when caulking both inside and outside your windows. We will also share tips on how to remove old caulk and apply new caulk the right way.
What Caulking Does for Windows
Caulking works as a flexible barrier that fills small gaps around window frames. This material creates a seal between your window frame and the surrounding wall. Properly applied caulk blocks unwanted air from moving in and out of your home through these openings. These gaps form over time due to natural settling, temperature changes, and structural shifts in your house.
The main job of window caulk is to stop air leakage. When applied correctly, it prevents conditioned indoor air from escaping and outdoor air from coming in. This seal blocks drafts during cold weather months and keeps your cooled air inside during summer. Your heating and cooling systems work less to keep your home comfortable.
Caulking serves as protection against moisture damage too. Without proper sealing, water can enter through gaps around windows and cause serious problems. This water infiltration leads to structural issues, wood rot, and mold growth if left unchecked. Fresh caulk creates a waterproof barrier that keeps rain and moisture outside where they belong.
The energy savings from window caulking add up over time. Sealed windows reduce the amount of heating and cooling needed throughout the year. This reduction results in lower monthly utility bills and a smaller carbon footprint for your household. For many homeowners, this makes window caulking one of the most cost-effective home maintenance tasks.
Window caulking offers more than just energy benefits. It keeps dust, pollen, and other outdoor pollutants from entering your home. The sealing action also reduces outside noise transmission, creating a quieter indoor space. Sealed windows also stop pests from getting in. They block small entry points that insects and tiny rodents could use.
Remember that caulking does not last forever. Windows naturally expand and contract with weather changes, which affects the caulk over time. Check and maintain window caulking regularly. This keeps benefits intact and stops issues from arising. First check your windows yearly for signs of caulk deterioration to stay ahead of potential issues.
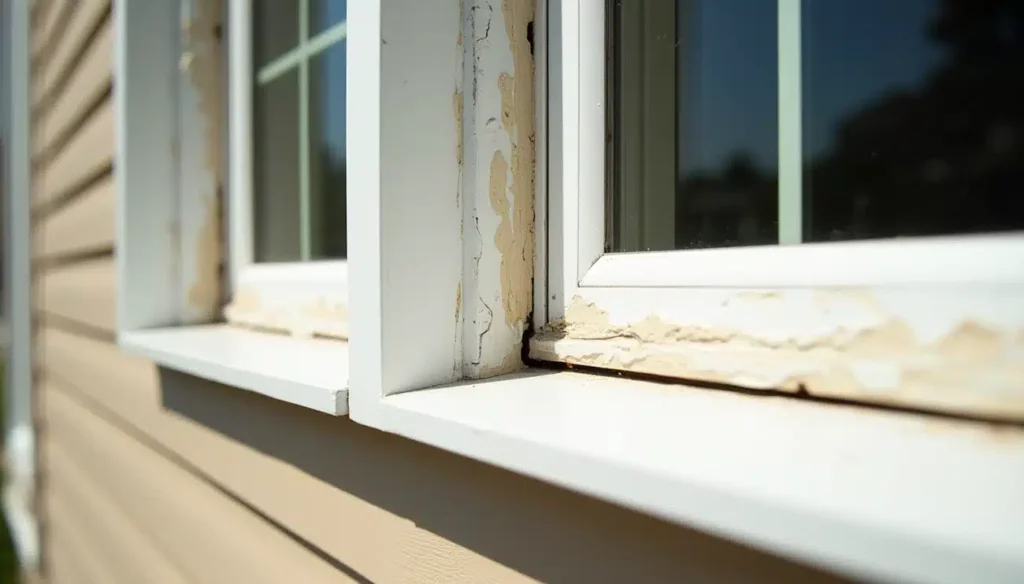
Where Not to Caulk Around Windows
Image Source: Houston Window Experts
Knowing where to avoid caulking prevents costly window damage. Windows have specific design features that must remain free of sealant to work as intended. Putting caulk in the wrong spots can trap moisture, block drainage, and even void your warranty. Learning what areas to skip helps your windows last longer.
Weep holes at the bottom of the frame
Weep holes are small openings at the bottom of window frames. These tiny holes let water drain out of the frame. They prevent moisture from staying inside the window structure. Caulking over weep holes blocks this drainage system.
Water trapped inside frames causes rust, rot, and mold growth. These problems happen in vinyl, aluminum, steel, and fiberglass windows. The only windows without weep holes are solid wood frames. Blocked weep holes may lead to foggy windows on hot days as condensation builds up.
Movable parts like sashes and tracks
Window sashes and tracks need to move freely. Applying caulk to these parts can seal your window shut. Many homeowners make this mistake when trying to fix drafty windows. The window needs space to slide and open correctly.
Instead of caulk, use weatherstripping for movable parts. This allows the window to move while still blocking air leaks. Windows need small gaps around the frame for thermal expansion and contraction. Filling these gaps too tightly can stress the frame and create cracks.
Trimmed-out window edges
Modern homes often have trimmed-out windows sitting above the siding. This trim redirects water away from the window naturally. Caulking around this exterior trim provides no benefit and may cause harm.
The trimming already keeps moisture away from the window. Adding caulk to these areas can trap moisture inside instead of letting it escape. This trapped water may damage your window frame and surrounding walls over time.
Above the window frame or drip edge
The top of window frames includes a drip edge. This feature directs rain and moisture away from the window. Caulking above the frame interferes with this water-shedding function.
When you seal the drip edge, water may flow toward the corners of the frame. These corner areas are weak spots where leaks commonly start. A properly working drip edge keeps the frame dry without needing caulk.
Large gaps that need backer rods
Caulk works best on narrow gaps measuring 1/4 inch or less. Larger openings around windows need different solutions. Using too much caulk for big gaps creates a messy, ineffective seal.
For wider gaps, install foam backer rods first. These rods provide a foundation for the caulk to adhere to. This combination creates a proper seal without wasting caulk or causing it to sag out of place.
Over old or cracked caulk
Applying new caulk over old caulk seems like a quick fix. This shortcut leads to problems down the road. The old caulk will continue pulling away, taking your new application with it.
Remove all old caulk before applying fresh sealant. Clean the surface completely to ensure good adhesion. Caulking over damaged or moldy caulk simply hides problems that will continue to grow worse underneath.
How to Remove and Apply Caulk
Image Source: Apex Window Werks
Proper caulk removal sets the foundation for successful window sealing. This task needs some planning and the right tools to get good results. Knowing how to remove old caulk and apply new sealant prevents window damage. The process takes time but saves money on future repairs.
Tools needed for caulk removal
You need specific tools to remove and apply caulk around windows. A quality caulk gun with a cradle design and ratchet action works better than cheaper options. Use a utility knife or razor blade for cutting old caulk instead of the cutter on the caulk gun. Gather materials like a putty knife, scraper, rubbing alcohol, and clean rags for the job. Add a caulk finishing tool or small spatula to smooth the new sealant for a clean look.
Steps to clean the surface
First, remove all traces of old caulk from the window area. Apply a softening agent like mineral spirits or rubbing alcohol to the old caulk and wait several hours for it to soften. Scrape away the softened caulk with a putty knife or caulk removal tool. Clean the bare surface with soapy water followed by isopropyl alcohol to remove dirt, oils, and residue. Let the area dry fully before moving to the next step.
Cutting the caulk tube tip
Cut the caulk tube tip at a 45-degree angle for best results. Make the opening about 10% larger than the bead you want to create. Avoid cutting too much off at once since you can always make the hole bigger. For silicone caulk, check for a membrane inside the nozzle that needs puncturing with a paper clip or the metal poker on your caulk gun. Test the flow on a scrap surface before starting on your window.
Applying a smooth bead
Hold the caulk gun at a 45-degree angle to the window surface. Apply steady pressure to the trigger while moving the gun along the joint in one continuous motion. Push the caulk into the gap rather than dragging it over the surface for better adhesion. Work in sections of about two feet at a time for more control. For larger gaps over 1/4 inch wide, install foam backer rod first to support the caulk.
Smoothing and drying the caulk
Smooth the bead immediately after application before it begins to set. Use a caulk finishing tool, damp finger, or popsicle stick to press the caulk firmly into the joint. This step removes air bubbles and creates a tight seal against both surfaces. For water-based caulks, use a wet finger to tool the line; for solvent-based products, use mineral spirits. Allow the caulk to dry according to the manufacturer’s instructions before exposing it to moisture.
When Caulking Isn’t Enough
Sometimes windows have problems that no amount of caulking can fix. Even the best caulking job cannot solve certain window issues. Knowing when to move beyond caulk saves time and money. These situations need different solutions or professional help.
Signs your window needs replacement
Windows show clear signals when they need replacement instead of caulking. Frames that feel soft to touch indicate rot that has progressed too far for simple fixes. Windows that stick or refuse to open point to structural problems in the frame. Visible warping or bowing in the frame means the window has undergone damage that caulk cannot address. If you see condensation between the glass panes, it means the seal is broken. This issue is common in double or triple-pane windows and can only be fixed by replacing the window.
Problems that caulk won’t fix
Caulk works for small gaps but many window problems need different solutions. Rotted wood frames need replacement since caulk only seals the surface while rot continues underneath. Major settlement cracks wider than 1/4 inch around windows often point to foundation issues that need structural repairs. Broken window parts, like cranks, locks, or balance systems, need replacement instead of sealing. Windows that leak air through the glass will waste energy. This happens even if the edges are sealed perfectly.
When to call a window contractor
Contact a window professional when problems go beyond what caulking can fix. Windows with serious water damage in wall cavities need expert help. This will stop mold from growing. Homes built before 1978 may have lead paint near windows. This makes it important to have professionals handle it safely. Windows that don’t perform well energy-wise, even with caulking, may need new units. Modern replacements offer better insulation. Replacement is cost-effective when repair costs hit around 50% of new window prices. This is true, especially for older windows with several issues.
Consider window replacement as a long-term investment in your home. New windows can reduce energy bills while adding value to your property. Modern window technology offers improved features that no amount of caulking can provide to older units. Professional installation ensures proper fit and function for years to come.
Final Thoughts on Window Caulking
Proper window caulking helps save money on energy bills while wrong caulking can lead to bigger problems. Therefore, you must remember to keep weep holes clear, avoid sealing moving parts, and never caulk over old material. Though caulk stops air and water from getting in, it cannot fix major issues like rotted frames or broken seals. Windows need the right care at the right spots to work well over time.
Additionally, the tools and steps matter just as much as knowing where to apply caulk. First, gather all needed items like a good caulk gun, removal tools, and cleaning supplies. Next, take time to remove old caulk fully and clean surfaces before adding new material. Last, cut the tube tip correctly and apply with steady hands for best results.
Nevertheless, some window problems go beyond what caulk can fix. Soft frames, stuck windows, or fog between glass panes mean you might need new windows instead of more caulk. Call The Smart Fix Handyman for help with caulking and window repairs when you face problems too big to handle alone. Their team can spot issues you might miss and fix them the right way.
After all, windows play a big role in home comfort and energy costs. Consequently, taking time to learn proper caulking methods pays off through lower bills and fewer repairs. Though the task might seem small, doing it right makes a big difference in how your home feels and works. Your windows will work better and last longer when you know both where to caulk and where to leave alone.
FAQs
Q1. Where should I avoid caulking around windows? Don’t caulk the weep holes at the bottom of the frame. Also, avoid caulking movable parts like sashes and tracks, trimmed window edges, and areas above the window frame or drip edge. These areas need to remain uncaulked to allow proper drainage and functionality of the window.
Q2. Is it necessary to remove old caulk before applying new caulk? Yes, it’s crucial to remove all old caulk before applying fresh sealant. Applying new caulk over old or damaged caulk can lead to poor adhesion and ineffective sealing. Always clean the surface thoroughly before applying new caulk.
Q3. What type of caulk should I use for window panes? For window panes, silicone or acrylic latex caulk is recommended due to their durability and flexibility. This caulk is waterproof. It also handles temperature changes without cracking or shrinking.
Q4. How do I know if my windows need replacement instead of caulking?
Here are signs your windows need replacing:
- Soft or rotting frames
- Windows that stick or won’t open
- Visible warping or bowing in the frame
- Constant condensation between glass panes
If you notice these issues, caulking won’t be sufficient and you should consider window replacement.
Q5. Can caulking fix all window-related problems? No, caulking cannot fix all window problems. It works well for sealing small gaps and stopping air leaks. But it can’t fix problems like rotted wood frames, broken window mechanisms, or the bad energy performance of old windows. In such cases, more extensive repairs or window replacement may be necessary.
Need a Handyman You Can Trust?
Skip the franchise fees. Get local expertise and honest pricing.