Powerful hurricane-force winds exceed speeds of 74 mph and can visibly damage your roof. Your shingles might lift and curl even during less severe storms with sudden gusts. Storm damage happens quickly to roofs, yet the resulting problems tend to linger. Your home remains vulnerable to weather risks year-round through various threats.
The ability to spot roof damage signs helps detect problems early. A typical hailstorm lasts just 15 minutes but leaves lasting dents in shingles and loosens granules. Minor issues can quickly escalate into major headaches without proper attention. Your repair costs will likely climb over time, so swift action saves money. Your home’s insurability also depends on fixing roof damage promptly.
Homeowners face unique weather challenges in Texas. The state experiences frequent hailstorms, and some storms produce hail ranging from quarter-inch to 4-inch size. Storm damage manifests in several ways after the weather clears. Your roof likely sustained damage if you notice dented gutters. Loose asphalt granules in gutters or on the ground signal the need to replace your roof.
Roofs deteriorate from more than just wind and hail damage. Loose flashing from high winds creates potential leak spots. Extended rainy periods often result in leaks, mold, and mildew problems. This piece explains how to inspect your roof after storms and the necessary steps to address any damage you find.
Common Types of Storm Damage to Roofs
Your roof takes a beating from storms in ways you need to know about. Weather extremes pound roofs all year long. Different types of damage leave telltale signs that you shouldn’t ignore. A quick check can catch problems early.
Wind damage and lifted shingles
Winds don’t hit roofs evenly – they follow specific attack patterns. The corners and edges of your roof face the highest wind pressure, which makes them easy targets. Winds of 45 mph or higher can break the adhesive seal and lift your shingles. Lifted shingles might flip over, crease, tear, or blow right off the roof. You should watch for shingles with raised edges or thin lines near the edges that suggest they’ve been flipped and creased. Your asphalt shingles can lose their protective granules from wind damage, which speeds up wear and tear.
Hail impact and granule loss
Hail leaves unique damage patterns on your roof. When hailstones hit, they create bruises or soft spots in shingles that feel like a bruised apple. These spots show up as dents with broken mats where granules have fallen off. Research shows that old organic mat-based asphalt shingles can break from one-inch ice stones. Glass-fiber mat shingles need bigger 1.25-inch stones to show damage. After hail hits, look in your gutters for excess granules that look like coarse sand.
Water pooling and leaks
Heavy rain poses serious threats to your roof. Puddles of standing water weaken shingle adhesive and can create holes. Water finds its way through tiny openings without proper drainage and damages your home’s interior. The weight of pooled water strains your roof structure and might cause sagging or collapse in worst-case scenarios. Water stains in your attic, even small ones, could mean serious hidden damage that needs quick attention.
Fallen debris and structural hits
Storm-blown debris can damage your roof directly. Tree limbs cause some of the worst damage – from small branches that scrape shingles to huge limbs that punch through the roof. Strong winds toss sticks, rocks, and trash onto your roof, which dent and scratch the materials. You should check for holes, tears, or obvious structural damage after storms. Piled-up debris also blocks your gutters and stops proper drainage, which leads to water damage.
How to Perform a Safe Roof Inspection
Safety comes first during roof inspections after storms. My roof checks always start from the ground to spot obvious damage without ladders. A walk around the house reveals missing shingles, broken pieces, and storm damage to the roof. This approach keeps me safe and provides a quick look at potential problems. The ground view helps me spot fallen debris and sagging areas.
Start with a ground-level visual check
Ground-level checks serve as the best first step in roof inspection. Walking around my house perimeter helps me note any visible storm damage. My roof looks different from various angles, which helps find problems that one spot might miss. Photos taken at this stage prove valuable for insurance claims later. This original assessment gives me a clear picture of damage without any dangerous climbing.
Use binoculars to spot missing shingles
Binoculars enhance roof inspection safety and accuracy. Close details of the roof become visible without ladder climbing. My binocular checks focus on cracked, broken, or missing shingles and any curling or lifted edges. The extra magnification reveals small problems like granule loss or tiny cracks. Sunny days offer the best visibility to spot damage.
Inspect gutters, vents, and skylights
Gutters often reveal the first signs of roof problems. Dents on gutters and roofing accessories like gable vents and overhangs need careful attention. Water tends to collect in these areas and shows damage faster than other spots. The flashing around chimneys, vents, and skylights needs inspection for gaps or missing sealant.
Check attic for leaks or water stains
The attic holds clues about hidden roof damage through water marks. A flashlight helps check dark corners and ceiling joists for water stains, mold, or damp spots. Daylight coming through the roof boards indicates holes or gaps that let water in. Damp or discolored insulation signals leaks that need quick fixes. These interior signs help connect to exterior damage.
Document damage with photos
Clear photos serve as crucial proof for insurance claims. Wide-angle shots of the entire roof and close-ups of damaged areas tell the full story. Time and date stamps verify when the damage occurred. Different lighting conditions and multiple angles highlight everything about the damage. These photos become essential evidence when filing insurance claims for repairs.
What to Do If You Spot Roof Damage
Quick action is essential when you spot roof damage. The clock starts ticking as soon as you notice storm damage on your roof. Your home could face bigger issues if you wait too long. Most insurance policies just need you to file claims within one year of the damage.
Call a licensed roofing contractor
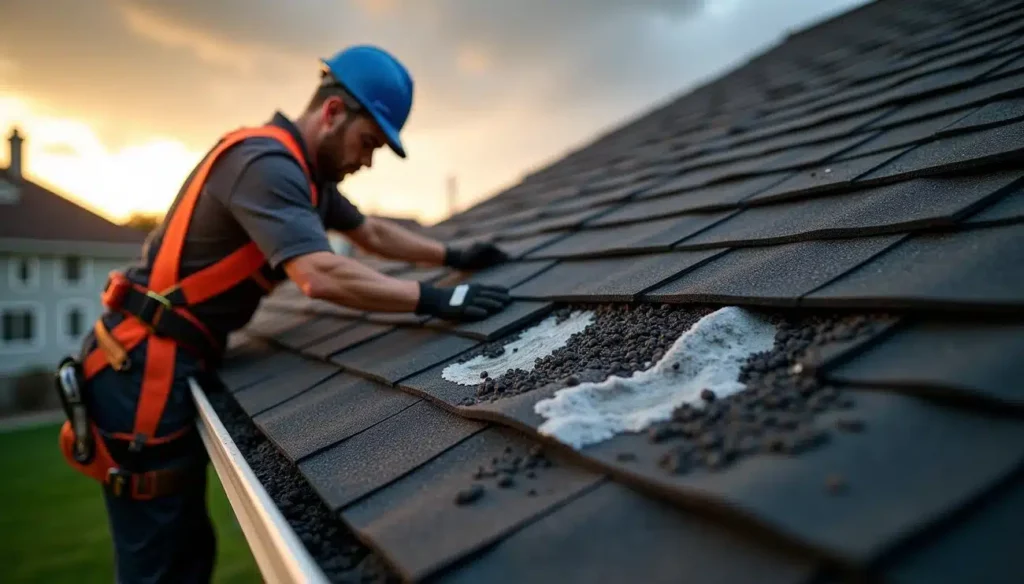
A trusted roofing contractor should inspect your roof right after a storm. Your friends, family, or neighbors might recommend local roofers they trust. Make sure your contractor has proper licensing and insurance that covers workers’ compensation, property damage, and personal liability. Roofers who regularly work with insurance companies can help you navigate the claims process better.
Get a professional storm damage roof inspection
Storm damage experts know the telltale signs to look for. They spot hidden problems that homeowners might miss. Your roofing expert will take photos and make detailed notes about the damage to support your insurance claim. You’ll get repair cost estimates that you can submit to your insurance company.
Avoid temporary DIY fixes
The roofing industry has one of the highest injury rates. Homeowners face serious risks from falls when they try DIY roof repairs. These repairs often end up costing more since you can’t get wholesale materials or professional tools. The manufacturer’s warranty might become void if anyone but licensed professionals handles repairs or installation.
Understand what is considered storm damage to the roof
Insurance providers say wind becomes harmful when speeds go over 50 miles per hour. Hail leaves dents in shingles and knocks off protective granules. Wind and hail damage might not show obvious signs of leaks right away. Small problems grow into bigger headaches if storm damage isn’t fixed quickly.
Filing Insurance Claims and Planning Repairs
Storm damage to your roof requires prompt filing of an insurance claim. The actions you take now will impact your repair timeline and coverage amount. Your insurance company needs proper documentation to approve the claim.
Contact your homeowners’ insurance provider
The moment you notice signs of storm damage to your roof, reach out to your insurance company. Describe the timing and nature of the storm that caused the damage. Make sure to document the name of each insurance representative you speak with. The insurance company might offer an advance payment if you need funds for immediate repairs. Your current phone number should be on file with the insurance company.
Submit photos and inspection reports
Your insurance claim needs detailed photo evidence of all damaged roof areas. The photos should be clear, time-stamped, and taken from several angles. Your documentation should include both panoramic views and detailed shots of the damage. The roofing contractor’s professional inspection report adds crucial support to your claim. Remember to maintain copies of every document submitted to your insurance company.
Understand your policy coverage
Your policy type matters – either Actual Cash Value or Replacement Cost Value coverage. The ACV policies provide payment based on your old roof’s current value. RCV policies will cover a new roof’s complete cost. The deductible amount should be clear before you submit claims. Your policy might have specific exclusions that could affect the claim.
Schedule repairs with a trusted contractor
The best contractors have extensive experience with insurance claims. They should readily provide proof of licenses and insurance. Multiple estimates help you compare with the adjuster’s findings. The law requires you to keep receipts showing deductible payments.
Conclusion
Your roof needs immediate attention after storm damage. A quick inspection from the ground using binoculars helps identify problems before they worsen. This approach lets you spot most issues, like missing shingles or dents, while staying safe.
Document any damage with photos to support your insurance claim. These photos will prove storm-related damage to your insurance provider. A licensed roofer should examine your roof next, as they can detect hidden problems you might overlook.
The insurance company needs notification right after you discover the damage. Explain the storm’s timing and its impact on your roof. Your claim should include all photos and the roofer’s report. The insurance company will send an adjuster to assess the damage and determine your repair compensation.
Roof repairs are dangerous work best left to professionals. Roof falls cause serious injuries frequently. Professional roofers have the proper tools and expertise to handle repairs safely. Make sure to save all repair and insurance claim documents for future reference.
Key Takeaways
After storms hit, knowing how to safely assess and address roof damage can save you thousands in repair costs and prevent further home damage.
• Inspect safely from ground level first – Use binoculars to spot missing shingles, dents, and debris without climbing dangerous ladders
• Document everything with photos – Take timestamped pictures from multiple angles as proof for insurance claims, which must be filed within one year
• Call licensed professionals immediately – Avoid DIY repairs that can void warranties and cause injuries; experienced roofers find hidden damage you’ll miss
• Contact insurance quickly after storms – Report damage promptly with photos and professional inspection reports to maximize coverage and speed up claims
• Know your coverage type – Understand whether you have Actual Cash Value (pays current roof value) or Replacement Cost Value (covers new roof costs)
Quick action after storm damage prevents small problems from becoming major structural issues. Professional assessment and proper documentation ensure you get the insurance coverage you deserve while keeping your family safe from dangerous DIY attempts.
FAQs
Q1. How can I identify storm damage on my roof? Look for missing or damaged shingles, dents in gutters or vents, and granules in downspouts. Check for water stains in your attic and inspect the roof from the ground using binoculars. Any shiny spots on shingles or visible splits with sharp edges could indicate hail damage.
Q2. Is it safe to inspect my roof after a storm? It’s safest to start with a ground-level inspection using binoculars. Avoid climbing on the roof yourself, as it can be dangerous. If you suspect damage, call a licensed roofing contractor for a professional inspection.
Q3. How soon should I file an insurance claim for roof damage? Contact your insurance provider as soon as you notice damage. Most policies require claims to be filed within one year of the damage occurring. Quick action can prevent further damage and improve your chances of claim approval.
Q4. Should I attempt DIY repairs on storm-damaged roofs? It’s not recommended to attempt DIY repairs on storm-damaged roofs. Improper repairs can void warranties and lead to more costly damage. Additionally, roofing work is dangerous and best left to licensed professionals who have the right tools and expertise.
Q5. What should I prepare before contacting my insurance company about roof damage? Before contacting your insurance company, take clear, dated photos of the damage from multiple angles. Have a professional inspection report ready, and know your policy details, including your deductible amount. Keep a record of all communications with your insurance provider.
Need a Handyman You Can Trust?
Skip the franchise fees. Get local expertise and honest pricing.