
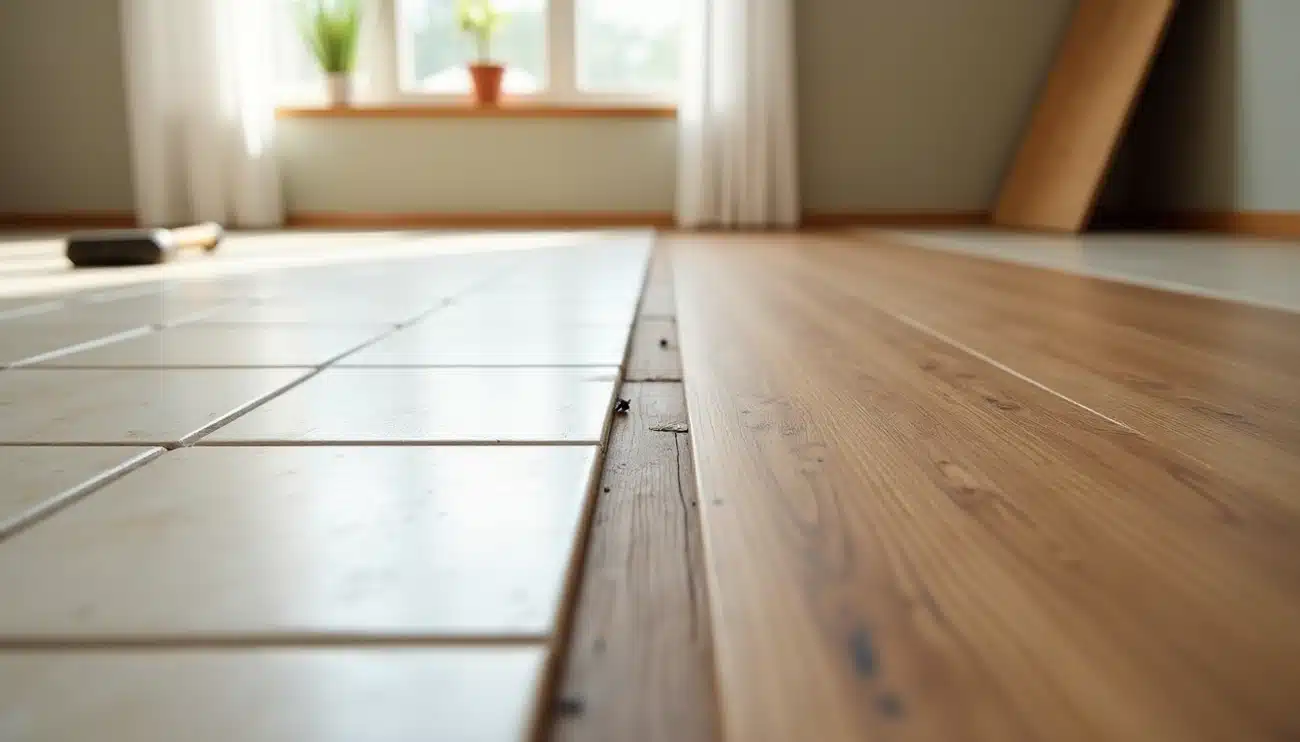
Can you put LVP over tile without breaking the bank or breaking your back? Absolutely! Professional tile removal can cost between $2 to $6 per square foot, potentially reaching a staggering $18,000 for larger homes. You can save time, money, and cleanup by installing luxury vinyl planks over existing tile.
Not only is LVP over tile a practical solution, but it also offers impressive benefits. True vinyl plank flooring is completely waterproof and very durable. This makes it less likely to crack compared to traditional tile. When you install LVP over tile, you get a stylish choice. It often looks just like real hardwood. Thickness is important too. A 7mm plank with padding can hide grout lines well. It also stops annoying clicking sounds when you walk.
We’ve done many LVP over tile projects. With good preparation and the right materials, this method is practical and looks great. In this guide, we’ll show you how to turn your worn tile floors into beautiful LVP surfaces. No demolition is needed!
Can You Install LVP Over Tile?
The easy answer to whether you can install luxury vinyl planks over existing tile is yes – in most cases, it’s completely doable. I really like this approach. It avoids the messy and costly tile removal. Plus, it still gives great results.
When it’s possible and when it’s not
For successful LVP installation over tile, your existing floor must meet specific conditions:
- The tiles must be securely attached to the subfloor with no loose pieces
- The floor surface should be mostly level throughout the room
- Grout lines shouldn’t be significantly deep
- The surface must be thoroughly cleaned and dried before installation
I always recommend checking the height clearance for doors and cabinets before proceeding. After measuring the height of your new vinyl planks, verify that doors will still open smoothly and no tripping hazards will be created. If the combined height of your tile plus LVP creates issues, you might need to reconsider your approach.
LVP installation over tile becomes problematic in several scenarios. If your tiles have cracks, chips, or significant lippage (uneven edges between tiles), these issues must be addressed first. Any dips in your flooring can void the manufacturer’s warranty and cause premature wear of your new vinyl planks. Furthermore, if multiple tiles are loose or damaged, installing LVP directly over them risks floor failure down the road.
One critical consideration involves grout lines. Deep or wide grout lines may “telegraph” through thin vinyl, creating visible patterns in your new floor. Gaps are a big problem for glue-down vinyl styles that need a solid surface. Consequently, you’ll need to fill them with self-leveling compound before installation.
Common misconceptions about LVP over tile
Many homeowners hold incorrect beliefs about installing LVP over tile. Let me clarify some common misunderstandings:
First, although you can install vinyl over tile, you cannot salvage those tiles later. Most vinyl-over-tile jobs need leveling compound to fill grout lines. This makes it nearly impossible to recover the tile later.
Another misconception concerns moisture. True vinyl plank flooring is indeed 100% waterproof. You could theoretically soak the planks, pull them up, allow them to dry, and relay them without damage. Moisture can get trapped between the tile and vinyl layers. This may lead to mold and mildew problems.
Some people worry about feeling grout lines through the new flooring. Proper installation and sufficient vinyl thickness, especially with padding, make this worry unnecessary. Many homeowners report they “cannot feel the grout lines whatsoever” after installation.
Finally, confusion exists about which flooring types support LVP overlay. You can install LVP over secure tile, hardwood, or glued-down linoleum. But you cannot install it over carpet or floating laminate floors.
Installing LVP over tile can be a great flooring option if the conditions are right. I recommend talking to a flooring expert before you start. They can help make sure this approach fits your needs.
Preparing the Tile Surface for Installation
Proper preparation of your existing tile surface is absolutely critical before installing LVP. High-quality vinyl planks can fail early if the surface isn’t well-prepped. In my experience with many installations, I’ve learned that good preparation is key. It can turn a floor into a professional-looking surface, instead of one that reveals every flaw beneath.
Check for loose or damaged tiles
First, conduct a detailed inspection of your tile floor. Walk across the entire surface, listening for any “crunching” sounds that might indicate loose tiles. Tap tiles with a hard object to identify hollow sounds that suggest poor adhesion to the subfloor.
Any unstable or damaged tiles must be addressed prior to installing LVP. For loose tiles, products like Fix-A-Floor work effectively:
- Tape off problem areas
- Drill small holes in loose grout
- Apply the adhesive product into the holes
- Place heavy objects on the tiles while drying
Unlike complete tile removal, repairs don’t need to be esthetically perfect since they’ll be covered by your new flooring. Cracked tiles and uneven surfaces can show through your vinyl planks. This may also void your manufacturer warranties.
Clean and dry the surface thoroughly
Once structural issues are fixed, cleaning becomes your priority. Any debris left under LVP can cause squeaking, crunching, or clicking sounds when walked upon.
For optimal results:
- Remove all loose dirt and debris
- Hand-scrape any old adhesive remnants
- Thoroughly vacuum with a shop vacuum
- Clean with appropriate tile cleaner
- Allow complete drying
This step is key for glue-down LVP. Contaminants can mess up the adhesive bond.
Level grout lines with self-leveling compound
Deep grout lines represent one of the biggest challenges when installing LVP over tile. If you don’t level properly, these lines will “telegraph” through your vinyl. This will create visible patterns.
Self-leveling compounds provide the most reliable solution:
- Clean the tile surface completely
- Mix compound according to manufacturer instructions
- Pour over the tile, focusing on grout lines
- Use a trowel or squeegee to spread evenly
- Allow full curing time (typically 24 hours)
For small projects with narrow grout lines, you can use embossing leveler. It’s made just for this job. Some installers have also used polymeric sand for filling just the gaps, though this is less ideal than proper leveling compounds.
For very uneven tiles, I’ve seen clever fixes. One idea is to layer duct tape. This can help create slopes away from the high spots. While unconventional, this method can work effectively when full leveling isn’t feasible.
Test floor height for door clearance
Since installing LVP over tile naturally raises your floor height, door clearance testing is essential. The usual gap between interior doors and the floor is about ½ inch to ¾ inch (12mm to 19mm).
LVP thickness varies from 2mm to 8mm, which—combined with existing tile (6mm-12mm)—can significantly reduce this gap. If doors won’t clear the new height:
- Remove doors
- Mark the amount to be trimmed (new floor height plus clearance gap)
- Cut door bottoms with appropriate saw
- Sand cut edges
- Apply finish to prevent moisture damage
Not considering height changes can impact how cabinets work and may cause tripping hazards where rooms meet. Planning for height differences will save you trouble after installing your vinyl.
Following these preparation steps will set a great foundation for your new LVP flooring. Good preparation is key to making your LVP over tile project look professional. It can also show every flaw in the surface underneath.
Choosing the Right Type of LVP
Choosing the right LVP for your tile overlay project means knowing the key differences between your options. The right choice will depend on your specific situation, skill level, and the condition of your existing tile floor.
Click-lock vs glue-down options
When installing LVP over tile, you’ll need to decide between two main installation methods:
Click-lock LVP has edges that snap together like puzzle pieces. This makes it a “floating floor” that isn’t fixed to the subfloor. This option is typically thicker and includes a built-in padding layer, making it more comfortable underfoot. I’ve done many DIY projects, and I find click-lock systems much easier to install. They don’t need professional help, and there’s no mess from adhesives.
Conversely, glue-down LVP requires spreading adhesive across your prepared tile surface. This forms a stronger bond that stops movement and boosts stability. It’s perfect for busy areas or rooms with moisture. Glue-down vinyl is usually thinner than click-lock options. This lower profile helps with door clearance issues.
Each type offers distinct advantages:
- Click-lock benefits: Easier DIY installation, built-in padding, simple replacement of damaged planks
- Glue-down benefits: More secure adhesion, better stability in high-traffic areas, less susceptible to temperature-related expansion/contraction
How thickness and padding affect performance
The thickness of your LVP significantly impacts performance when installing over tile. Thinner products often flex more. This can show grout lines or flaws in the subfloor as time passes. Based on my research and experience, I suggest not using any product thinner than 5.5mm for tile overlay projects.
Thicker LVP (6-8mm) resists flexing better. It also hides grout lines and small flaws in the tile below. Also, LVP with padding makes for smoother transitions and cuts down on clicking sounds when you walk on it.
The wear layer—the clear protective top coating—determines scratch resistance and durability. Thicker wear layers don’t always mean better scratch resistance, despite what many think. The wear layer matters most. It can include aluminum oxide or ceramic beads, which boost durability.
When to use underlayment or vapor barrier
Additional underlayment isn’t always needed or helpful when putting LVP over tile, despite what many think. Adding underlayment under LVP with attached padding can cause too much cushioning. This can hurt the locking system’s integrity.
For moisture protection, consider these guidelines:
- Over concrete tile floors: Use a Class I moisture barrier to prevent moisture migration
- With cork-backed LVP: A thin moisture barrier may be beneficial
- With built-in underlayment: Skip additional underlayment to avoid compromising floor stability
Remember, vinyl flooring is waterproof, but your subfloor isn’t. A good moisture barrier stops mold and mildew from forming between your tile and new LVP flooring.
Consider these factors to pick LVP that works best on your tile floor. This choice will give you years of beauty and no hassle.
Step-by-Step Installation Process
Now comes the hands-on part of transforming your tile floor with beautiful new luxury vinyl planks. Using a step-by-step approach makes sure your installation looks great and lasts a long time.
1. Measure and plan your layout
Begin by measuring the length and width of your room precisely. Multiply these figures to calculate the square footage, then add 10-20% extra for cutting waste and future replacements. Sketch a diagram of your room, including all obstacles like doorways and cabinets.
For optimal esthetics, plan to lay planks parallel to the longest wall dimension. Check if your first and last row will need trimming by dividing your room width by plank width. Ideally, these edge rows should be at least 3 inches wide on both sides. Create a starting line that’s square to the room, particularly important in older homes with bowed walls.
2. Acclimate the planks
Allowing your LVP to adjust to room conditions is non-negotiable for preventing expansion issues. Place unopened boxes flat in the installation room for at least 48 hours before beginning. Maintain the room temperature between 65-85°F during this period. This crucial step prevents buckling, gapping, or failure of the locking system after installation.
3. Dry lay to test fit
Before permanent installation, lay out your first few rows without adhesive or clicking them together. This “dry run” confirms your layout plan works and helps identify potential problems. Check that seams will be staggered at least 6 inches apart for a natural look. Ensure the first row aligns with your chalk line, maintaining proper expansion gaps.
4. Install using your chosen method
For click-lock installation:
- Remove the tongue from the first row of planks facing the wall
- Maintain a 1/4-inch expansion gap around all walls
- Connect planks using a 30-degree angle approach—push forward then lower
- Tap planks together using a tapping block to avoid damage
- Use a pull bar for edges near walls where space is limited
For glue-down installation, start in the center of the room rather than corners. Apply adhesive in sections, allowing it to become tacky but not fully dry. Press planks firmly into place, working in manageable sections.
5. Trim edges and reinstall baseboards
Once all planks are installed, cut the final row to fit, removing the tongue for a flush wall fit. Install transition strips in doorways where flooring changes. Reinstall baseboards to cover expansion gaps, or add quarter-round molding for a finished look. For glue-down installations, roll the entire floor with a 75-100lb roller to secure bonding.
Finishing Touches and Common Mistakes to Avoid
The final touches on your LVP installation over tile matter a lot. They can make your project look professional or amateur. Paying attention to these final elements can make all the difference in both appearance and functionality.
Use transition strips between rooms
Transition strips serve multiple crucial purposes in your LVP installation. They create a smooth path between rooms with different floor heights. This helps prevent tripping hazards. They protect the edges of your new flooring from damage. They also create visual boundaries between spaces.
Several transition types are available depending on your specific needs:
- T-molding: Ideal for connecting two floors of equal height
- Reducers: Perfect when transitioning from LVP over tile to a lower surface
- End caps: Designed for edges that meet vertical surfaces like hearths or sliding doors
Installing transition strips is easy. First, secure the metal channel to the subfloor. Then, snap the decorative top piece into place. Undercutting door jambs and trim creates a cleaner look than trying to cut the flooring around these obstacles.
Seal edges if needed
In wet areas like bathrooms and kitchens, sealing the edges of your LVP installation adds extra protection. For a waterproof installation, apply silicone caulk where the flooring meets walls or fixtures. This step boosts waterproofing. It stops moisture from getting under your new floor.
Sealing isn’t just about hiding big gaps. It’s about giving a smooth, finished look and protecting your investment. Apply caulk after installing baseboards for the cleanest look.
Avoid these common LVP over tile problems
The most frequent issues with LVP over tile installations include:
- Telegraphing: Thin, flexible vinyl can sink into grout lines, making the underlying tile pattern visible. Solution: Use self-leveling compound to fill grout lines completely.
- Peaking and warping: Occurs when insufficient expansion space is left around the perimeter. Solution: Maintain proper 1/4-inch gaps around all walls.
- Moisture problems: While LVP is waterproof, moisture trapped beneath can cause mold. Solution: Use appropriate moisture barriers in vulnerable areas.
- Damaged locking systems: Poor handling or bad installation can break the key connections between planks. Solution: Follow manufacturer guidelines exactly when connecting pieces.
Conclusion
Installing luxury vinyl planks over existing tile is a smart, budget-friendly choice. It saves you from costly demolition. In this guide, we covered key preparation steps, how to choose materials, and installation techniques. These elements help you achieve great results.
Above all, proper preparation determines your project’s success. To fix loose tiles, clean the surface well, and fill the grout lines. This will help your new floor have a strong foundation. Choosing LVP with the right thickness and installation method ensures great-looking, long-lasting results.
This transformation not only saves money but also eliminates the mess and hassle of tile removal. Therefore, many homeowners find LVP overlay projects manageable even without extensive DIY experience.
For tough jobs that feel too big or need special skills, call The Smart Fix Handyman. They can help with flooring and tile work at home. Their professional assistance can ensure your flooring project achieves perfect results.
Your patience and attention to detail during installation will give you a beautiful new floor. It will be waterproof. Transition strips, sealing, and finishing touches make your project look professional or rushed.
By following this guide, you have what you need to change your old tile into stunning luxury vinyl planking. Your careful planning and execution will yield a floor that looks great, performs exceptionally, and stands the test of time.
FAQs
Q1. Can I install luxury vinyl planks directly over existing tile? Yes, in most cases you can install LVP directly over tile. However, the existing tile must be securely attached, level, and free of significant damage. To install successfully, you must prepare properly. This means cleaning and possibly filling grout lines.
Q2. Do I need to use underlayment when installing LVP over tile? Usually, you don’t need extra underlayment when putting LVP over tile. This is especially true if the LVP already has built-in padding. A thin moisture barrier can help in some cases. This is especially true for concrete tile floors and cork-backed LVP.
Q3. How thick should LVP be when installing over tile? For best results, choose LVP that’s at least 5.5mm thick when installing over tile. Thicker options (6-8mm) are better. They resist flexing more and hide grout lines and small flaws in the tile surface.
Q4. What’s the best way to prepare a tile floor for LVP installation? To prepare properly, first check for loose or damaged tiles. Repair any issues. Next, clean the surface well and let it dry. Finally, use a self-leveling compound to fill deep grout lines. It’s also crucial to test floor height for door clearance before installation.
Q5. What are common mistakes to avoid when installing LVP over tile?
Common mistakes are:
- Not leaving enough expansion gaps.
- Not preparing the tile surface well.
- Choosing LVP that is too thin.
- Ignoring moisture issues.
Follow the manufacturer’s guidelines closely. This helps prevent damage to the locking system during installation.